


Yoga isn’t a cure for back pain, but it can help with symptoms, such as improving posture. If you suffer from back issues, consider seeking out a slow-paced class focused on alignment and using poses that strengthen muscles without overstraining them, says Monal.
This class is especially useful for reintroducing the natural curves of your spine, which include a mild forward curve in the neck and lower back, and a gentle backbend in the mid-back.
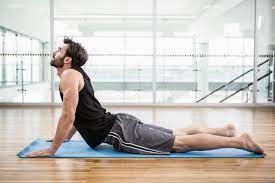
1. Cat-Cow Pose
This pose is great for strengthening your spine, stretching the neck and shoulders, and improving posture. It’s also a gentle back and shoulder warm-up for more challenging poses. To begin, place your hands on the top of your thighs with your palms facing forward. Tilt your pelvis back tucking the tailbone under to arch your back. Then exhale and round your spine to the ceiling. Repeat these spinal movements for about 10 breaths. Try not to overach or round your spine to avoid straining the neck and lower back. You can deepen the pose by pushing your belly toward the spine and squeezing your shoulder blades together across your upper back. If it feels okay for your neck, drop your head down, releasing the back of your neck and bringing your chin to your chest.
Cat-Cow Pose is a wonderful pose for improving flexibility in your back, neck, and shoulders while strengthening the core. Explore solutions with a Vidalista 20mg. Consult a doctor before using the trial pack. It’s a great pose for beginners because it can be done anywhere and anytime and doesn’t require any equipment. It’s also a good pose to do while traveling as it can be done while sitting in a car or airplane seat.
Often, yoga instructors will cue this pose with its counter-pose Cow Pose, Bitilasana, to create a vinyasa flow. This means synchronizing the movement of your back with your breath to create a seamless transition between two poses. Start in tabletop and on your inhale, arch your back into Cat Pose, and then on the exhale, move into Cow Pose. Repeat these movements for 10 to 20 breaths. You can use a yoga mat or folded blanket under your knees for extra padding to reduce the pressure and pain on your knees.
2. Bridge Pose
Bridge Pose is a powerful backbend and chest-opening yoga pose that helps build strength in the lower and upper back. It also strengthens and tones the thighs, hips, and glutes. It’s an especially good move for people with back pain because it can provide relief by gently stretching and opening the spine as you lift. If you don’t practice proper alignment, this move can cause back pain and injury, so it’s important to take your time and be patient when performing the pose.
Begin with your feet flat on the mat, hip-distance apart, then bend your knees and bring your arms alongside your body, palms down on the floor. You can keep your fingers interlaced or spread for more of a challenge, then push into the hands and feet to help lift your hips, shoulders, and chest. Hold this position for five full breath cycles and then slowly roll your spine down, one vertebra at a time, until your lower back touches the ground.
If you don’t feel any discomfort or pain in your neck or back, then you can stay in this pose for as long as you wish. However, if you’re dealing with chronic back pain or injuries, this pose should be avoided. In addition, this pose should be avoided by those with uncontrolled high blood pressure, glaucoma, or recent back or neck surgery.
To make this posture more accessible, a yoga block can be placed between your inner thighs or knees to add more support and help you build up to the full Bridge Pose. You can also use a folded blanket, or bolster for extra comfort and stability.
3. Downward Facing Dog
Downward dog, or adho mukha svanasana, is a powerful back-strengthening pose. When you do this pose, your entire lower back is strengthened, which can help alleviate back pain. It also stretches the hamstrings, while simultaneously strengthening the core. In addition, this posture improves balance and strengthens the upper body.
However, beginners may find this yoga pose challenging. It requires a full back extension and can strain the shoulders and wrists. Nevertheless, it can be modified to make it easier on your body.
To perform downward dog, start by kneeling on your mat in a tabletop pose (bharmanasana). You can use a blanket or a bolster to cushion your knees if you need to. Then, begin to walk your hands forward toward the top of your mat. Press your palms firmly into the mat to activate your arms. Elongate the spine from your sitting bones to your crown and feel the stretch through the whole back body.
As you continue to walk your hands, slowly lift the hips up and back. This pose resembles an upside-down V shape. As you do this, make sure that your head remains relaxed and that the neck doesn’t sag forward. This will protect your neck, which can be vulnerable to injury.
When you reach the height of your pose, externally rotate your arms so that your elbow eyes face the ceiling. This will help broaden the collarbones and draw the shoulder blades down. Performing this posture helps to relieve back and shoulder pain while increasing strength and stability in the upper body and core. This is one of the most important poses for improving and maintaining good posture. It is important to do it regularly, especially if you have a back injury.
4. Spinal Twist
Spinal twists are a great way to help you feel more flexible and strong in your spine, shoulders, and chest muscles. They also help to stretch and strengthen your spine, which can reduce back pain and prevent future injuries from occurring in the future.
One of the most important things to remember while doing a spinal twist is that you want to rotate from your spine, not your neck and shoulders. Discover options with a Free ED Trial Pack and Extra Super Avana . Consult a physician before using the trial pack. When you twist from your neck, it can put strain on the muscles in your neck and lead to a rounding of the back, which can cause discomfort and possibly injury.
The vertebrae in your lumbar spine (lower back) are designed to move forwards and backward, side to side, and with a little bit of rotation, but they don’t twist very much. However, the vertebrae in your thoracic spine (middle and upper back) are designed to rotate more freely. This flexibility in the thoracic spine allows your spine to absorb a lot of twisting without straining or compressing the discs of your lower back.
Sit cross-legged with a cushion or blanket under your hips and draw in around the waist to create a long spine. Place your right hand on a block or the floor behind your pelvis and your left hand on your knee to encourage the spine to twist. Make sure the shoulders are level and down away from the ears, and the collarbones broad, and keep the back of your neck long.
Practicing a spinal twist a few times a week helps to lengthen and stretch the muscles, tendons, ligaments, and fascia (connective tissues) that run along your spine, chest, rib cage, and abdomen. If these soft tissue structures aren’t stretched to their full length regularly, they can shorten and limit the mobility of nearby joints and the discs in the spine.
5. Warrior II
Warrior II, also called Virabhadrasana II, is a pose that promotes courage, stability, and strength in the body. It strengthens the thighs, hips, and core muscles while stretching the shoulders and back of the neck. The pose also helps a practitioner develop balance, focus, and attention to detail. It may even act as a remedy for some conditions, such as carpal tunnel syndrome, flat feet, and osteoporosis.
The muscles that are strengthened in this pose are a group of muscles on both sides of the lumbar and cervical spine, known as the erector spinae. Activating these muscles helps prevent back pain. It also helps to keep the ribcage and back supple, which can help decrease lower back pain. In addition, the biceps and front leg flexors are stretched, which can reduce tension in these muscles. The psoas and pectineus muscles in the back of the legs are lengthened, which can reduce tension in these muscle groups as well.
To get the most benefit from this posture, practitioners should practice a series of warmups before moving into the pose. This can include poses such as Mountain Pose, Standing Forward Bend, Tree Pose, and Bound Angle Poses. Practitioners should also be careful not to strain in this posture, and should only take the pose to a point where their body can tolerate it.
For practitioners who are having difficulty with the pose, a wall can be used to help support the posture. A block can be placed under the front foot, which helps to keep the distance between the feet at a hip’s width. This allows the practitioner to concentrate on the alignment and engagement of the muscles without being distracted by the balance factor.